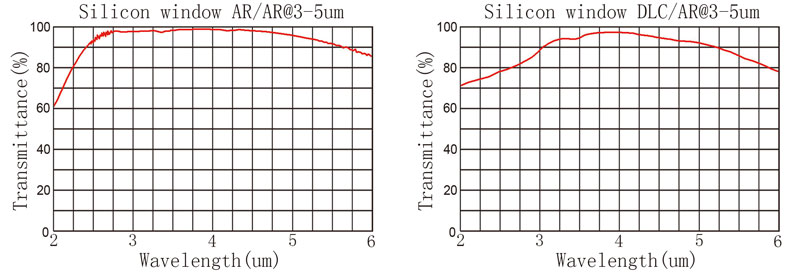
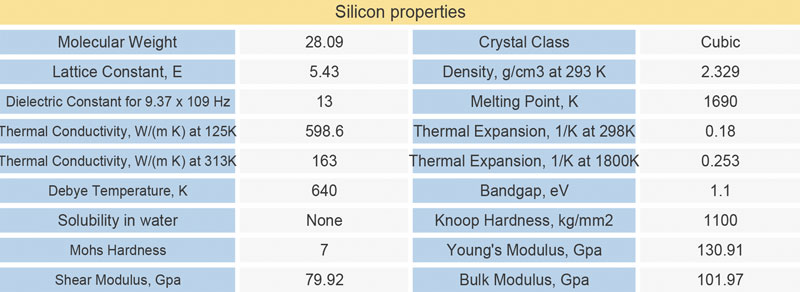
[China Aluminum Network] With the continuous improvement and improvement of the surface treatment technology for aluminum alloy profiles for construction, the requirements for product quality should also be increased accordingly. For this reason, the newly issued 2000 national standard GB/T 5237.1- 5237.5 "aluminum alloy building profiles" in the 1993 version of GB/T5237 based on a large-scale revision, the original metallurgical standard YS/T 100-1997 "electrophoretic painting aluminum alloy building profiles" and YS/T 407-1997 " Powder Electrostatic Spraying of Aluminum Alloy Building Profiles was jointly incorporated into the standard and the content of fluorocarbon paint sprayed profiles was increased. In the revision process, a large number of references adopted advanced foreign standards, among which the performance indicators of GB/T 5237.2-2000 "Aluminum Alloy Building Profiles Part 2 Anodizing, Coloring Profiles" were in accordance with Japanese Industrial Standard JIS H8601. Aluminium and Aluminum Alloy Anodized Films are consistent with the alkalinity-resistant performance specifications. However, there are still some differences in the test methods. The drop-alkali test method specified in Chinese Standard GB/T 5237.2 is a visual observation method or instrument measurement method, while the alkali resistance test method in Japanese Industrial Standard JIS H 8601 only stipulates. The instrument measurement method [Note: The alkali resistance test method in Japanese Industrial Standard JIS H 8601 specifies two kinds of instrument measurement methods, one is an alkali resistance test by electromotive force; the other is an alkali drop test. The "alkali spot test" is an instrumental measurement method used by some domestic inspectors for the drop test method. ]. 1 Test principle China's aluminum alloy construction profile national standards and Japanese industrial standards do not describe the principles of the drop-alkaline test method, and in order to better grasp the drop-base test operation method, it is necessary to understand the principle of the drop-alkaline test method. The drop alkali test is mainly used to examine the alkali corrosion resistance of the anodic oxide film. For the anodized film, its alkali corrosion resistance is relatively poor, when a certain concentration of sodium hydroxide solution is dropped on the surface of the anodized film, the anodized film will be eroded quickly if the plugging is poor or the oxide film is loose When the anodic oxidation film is poor in alkali corrosion resistance due to other reasons, the etching rate will be faster. Therefore, the calculation of the penetration time of the anodic oxide film can be used to evaluate the alkali corrosion resistance of the anodic oxide film. However, since the etching rate of the oxide film by the sodium hydroxide solution is high, it is difficult to evaluate the alkali corrosion resistance of the oxide film. At present, there are two main test methods for dripping tests, one is visual observation and the other is instrumental measurement. The visual observation method is based on that when the sodium hydroxide solution is dropped on the surface of the oxide film, the oxide film will slowly dissolve. The chemical reaction equation is as follows: Al2O3·χH2O+2NaOH=2NaAlO2+(χ+1)H2O During the dissolution process of the oxide film, the sodium hydroxide solution continues to erode inside the oxide film. After the sodium hydroxide solution erodes to the surface of the substrate metal, a displacement reaction occurs between the metal aluminum and the sodium hydroxide solution, and hydrogen gas will precipitate during the reaction process. Corrosion bubbling occurs. The chemical reaction equation is as follows: 2Al+2NaOH+2H2O=2NaAlO2+3H2 The instrument measurement method is based on the electrical insulating properties of the anodic oxide film. The aluminum substrate is a good conductor of electricity, and the aluminum anodic oxide film is a high-resistance insulating film whose insulation is related to the thickness of the oxide film in the oxide film. In the process of being dissolved by the sodium hydroxide solution, the resistance will gradually decrease as the thickness of the oxide film decreases, and when the resistance is reduced to a certain value, it can be considered as conductive, ie, the oxide film is considered to be dissolved. 2 Observations of visual observation and discussion of main influencing factors The key considerations for the dripping test are the control of the test temperature and how accurately the time that the oxide film was just penetrated. The test method for dripping alkali in GB/T 5237.2-2000 in China is as follows: “At approximately 35°C±1°C, approximately 10 mg and 100 g/L NaOH solution are dropped onto the surface of the profile specimen, and the droplets are observed visually until corrosion occurs. Bubbling, calculating the time that the oxide film was penetrated.Also, the instrument can measure the time for the oxide film to penetrate." That is to say, the national standard has approved two kinds of drop-alkali test methods, that is, visual observation and instrument measurement. For the visual observation observation method, the description of the national standard is relatively simple, and some considerations and influence factors in the test operation are not described. In order to ensure the accuracy of the test results, attention should be paid to the influencing factors during the operation to minimize or avoid the influence of these factors. The following points should be noted in this method: (1) Control of the sample The test surface of the sample must be kept intact and no damage such as scratches or scratches is allowed. The surface to be inspected must be clean and dirt, oil, and other dirt must not be covered on the surface to be inspected. Therefore, it is generally used before testing. The organic solvent that does not damage the oxide film gently wipes the surface of the sample; (2) The concentration of the test solution must be strictly controlled to 100 g/L. The concentration is too low or too high, which will directly lead to large test results. (3) Test temperature control, not only to ensure that the test environment temperature is controlled at 35 °C ± 1 °C, and the test solution and sample must also be controlled at 35 °C ± 1 °C, for which it should be The test solution and the sample are placed in a constant temperature instrument for a period of time. The test can be performed only when the test solution and the sample are constant at 35°C±1°C; the fourth is the selection of the thermostatic instrument, and the selection of the thermostatic instrument is in this square This is a very important part, because the chosen constant temperature instrument should not only serve as a constant temperature, but also must consider the ease of observing the change of the sample in the instrument. If none of the selected constant temperature instruments can clearly observe the inside of the instrument It is impossible to accurately determine when the sample begins to corrode and bubbling. In addition, the visual observation method was also influenced by the experience of the test personnel. In the actual inspection work, it was found that there was not a clear process from the dissolution of the anodized film to the penetration of the oxide film (the sample began to corrode and bubbling). The change brings great difficulty to the determination of the oxide film penetration time. This places high requirements on the test personnel. The test personnel must have very rich practical experience and can accurately determine when the oxide film is Penetrate and begin to corrode. The refractive index of the monocrystalline silicon material is about 3.42, and the reflectivity of the silicon lens after polishing is about 30% in the air environment. Our common silicon lens and silicon window can be coated on the surface (Antireflection Coating), which can reduce the reflectivity to less than 1.5% between 3 to 5 um.
Some silicon elements, especially the silicon protected windows, are exposed to dust, acid, salt and so on in the harsh environment. The conventional multilayer antireflection coating will be damaged and affect the normal work of the equipment. At this time, we need to make DLC coating on the surface of the silicon lens.
Diamond-Like Carbon (DLC) Coated Silicon Windows are engineered for 3 to 5µm, making them ideal for infrared defense applications such as thermal imaging.
Silicon Lens,Silicon Optical Lens,Infrared Si Lens,Silicon Plano-Convex Lens China Star Optics Technology Co.,Ltd. , https://www.opticsrealpoo.com
Diamond-Like Carbon (DLC) Coated Silicon Windows provide anti-reflection coating on one surface and a specially designed DLC coating on the other surface, making these windows highly durable and ideal for harsh environments.


Silicon lens specifications:
Standard precision
High-precision
Dimension Tolerance
φ5-250mm+0/-0.2
φ3-350mm+0/-0.2
Thickness Tolerance
1-50mm+/-0.1
1-50mm
Centration
3 arc minute
1 arc minute
Surface Quality
60/40
20/10
Power(fringe@633nm)
N<λ/2@633nm(in 25mm)
N<λ/10@633nm(in 25mm)
Clear Aperture
>90%
>95%
Chamfer
Protected <0.5mmx45deg
Protected <0.5mmx45deg